E Collar
How to make an E-collar specifically for smaller gliders:
What you need:
- One plastic presentation folder
- Two packages of moleskin. Preferably the kind from Dollar General(cheap kind) as it has no padding* (Moleskin is stuff that you put on your feet to prevent from callousing)
- Cotton, or foam. I used contour sand paper. I cut it into strips and cut the sandpaper part off Cotton balls, pads or strips? Contour sand paper is sand paper made for sanding things such as wooden chair arms, it has a hard foam like substance on one side and a fine grained sand paper on the other.**
- Scissors
- Ruler
- Pen
clear duct tape
- If you use the moleskin that has foam (like Dr Scholl's) in it then these directions aren't going to work without modifications
** If you use the moleskin with foam then these items are not necessary.
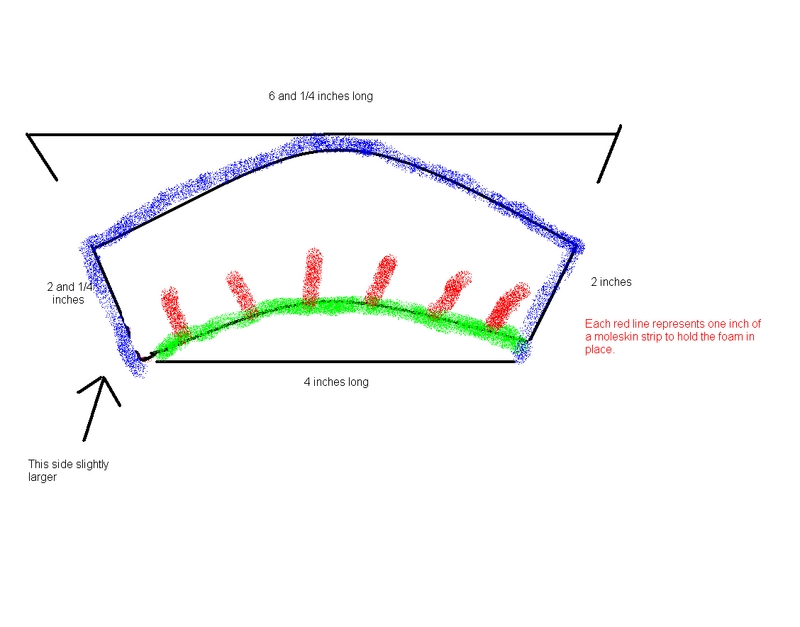
1. Draw on the clear plastic part of the folder this picture and cut. BE SURE TO MAKE IT LARGER THAN THE MEASUREMENTS FOR ROOM FOR MISTAKES!!
The size of your glider's head is dependent on the size measurements, our size measurements are on the picture. Our glider was 4 months out of pouch, when this was made. I'd say add and inch because modifications will be needed for your glider's unique form!
2. Now line your cotton or foam around the bottom of the collar. I have it illustrate in the picture as a bright green. If you notice the green isn't covering the entire bottom of the collar, this is so you can fold the collar easier and it stays snug on the glider's head. The foam-free area should be no more than 2 cm long. The strips of foam or amount of padding should not exceed 3/4 inches toward the top of the collar. The width of the collar with foam on both edges should be about 3/4 inches as well.
How to line foam: I cut small strips( give example of size strip you used) of the moleskin and covered the inside bottom, outside bottom, and the outer edge with foam and used the moleskin strips to keep it on. The red lines on the picture can indicate how often you put a 3/4 inch of moleskin to keep the padding in place.
3. Cover the foam in big sheets(give size example) of moleskin, but do not cover the entire collar. The red color on the picture should demonstrate how far into the collar you should put moleskin or your glider will chew on it.
4. Now cover the sides that are blue in moleskin. This will prevent the glider from cutting his or her hands on the top of the collar, and will reduce friction, making it harder to slip off. This will be all edges covered in moleskin.
5. Have someone hold your glider while you slip this on his neck and tape to him. In order for the collar to hold you may want to bend it before trying to put on so the plastic of the folder will not resist the new shape and slip off. Use the side not having foam to lap over the the full side. (many edits in this sentence)
6. THE COLLAR SHOULD BE SNUG BUT NOT TIGHT. Actually you will probably think you are choking your poor baby. Watch him or her in the collar and check their nose. If the nose turns blue within three minutes remove the collar and loosen it.
Your glider WILL resist the collar and make every effort possible to get it off, if you notice it throwing it's body around do not freak out. He or she is just startled at the collar and fighting it. Unless it has seizures, then remove the collar. Do not get frustrated and give up on the collar if he or she gets it off. My glider got the collar off all the time for two weeks, and he is alive because we kept persisting and he started fighting less and less. He was in it for three months and still fought somewhat to the last day he was in it. He is alive due to the collar, so persistence is key!
Click to enlarge
 | Elizabethan Collar |
SEE ALSO:
Quick and easy plastic lid e-collar
Alternative plans
More plans
Search for E Collar on all of Sugarglider.com.
|
 Home
Home Glider Gossip
 Gliderpedia
 Journals
 Resources
 Fun Stuff